April 18, 2019 / admin / 3 Comments
Just less than a year ago, I wrote a similar tutorial when version 4.3 was released. I began that article with the words “There seems to be a lot of confusion regarding how to update Prepar3D”. While ten months may have passed, the confusion hasn’t. So as I stated before, I’m going to do my best to provide you a step-by-step guide for how to update Prepar3D. Or at the very least, how I update my own instance of Prepar3D.
About This Guide
This step-by-step guide was written specifically for the Prepar3D version 4.4 to 4.5 update and written/published in mid April of 2019. Lockheed Martin released P3D v4.5 on 9 April 2019. If you are referring to this guide anytime after version 4.5 (v4.6, v4.7 etc.) then this method should also work as well. Unfortunately my crystal ball isn’t working for peering into the future, so who knows how the update process will work for P3D v5 (if there is such a thing). What I’m trying to say here, is content on the Internet tends to live forever and you might be stumbling on this writing a year, two or more from the time I wrote it. Just keep that in mind.
The Update Process
Just a little background for those that may not be aware. I believe, starting with P3D v3.x, Lockheed Martin developed P3D to be somewhat modular in the way one can update and maintain the simulator. This modular setup consists of three main files with the first being the Client, the second being the Content and the third being the Scenery. When Lockheed Martin develops, tests and deploys an updated version to us, we no longer need to completely uninstall the entire P3D application just to take advantages of the updates. In many cases, only the “Client” portion of the update needs to be applied. But you should do your homework to best determine exactly what you need to update to take advantage of all the new bells and whistles available.
Prepar3D version 4.5 Change Log
To aid you in understanding all the changes included in the P3D v4.5 update, please follow this link. Use this information to determine what you want to update.
My Update Process
As I do each and every time a new P3D update is released by Lockheed Martin, I study the change log to determine my action plan. As was the case with the version 4.4 update, I personally am not interested in the updates which have been made to the Content and the Scenery. So this update will be super simple for me, as I’ll only be updating the Client portion. If you desire to update either the Content and/or the Scenery…then go ahead and do so.
Step One
Make note of P3D Settings. Before I perform an update, I typically will start up P3D and take screen captures of all the settings screens. This way, if anything gets changed during the update process…I’ll be able to quickly reset everything back to the way it was before. I like to run P3D with the updated version with the same settings I ran on the previous version first, before tweaking anything. This way I have a better determination on just what improvements were made and how these improvements impact my setup.
Step Two
Download the update files required. As I previously mentioned, I’m only planning to update the Client for v4.5. You’ll need to login to the downloads section of the Prepar3D website with your license or account credentials. Once there, click to expand the individual component downloads section and download the following file: Install_Client.msi. Once downloaded, I typically place all the files into a new folder I create on the Windows desktop for ease of access.

As a side note, if you were interested in updating the Content, you would also need to download the Install_Content.msi along with BOTH the cont1.cab and cont2.cab files. Same would apply for Scenery. You would need to download the Install_Scenery.msi along with all seven of the sceneX.cab files.
If you are planning to update Content and/or Scenery, then just place the .cab files in the same location as you’ve downloaded the Install_Content.msi and/or Install_Scenery.msi files. When you go to run the install on the content/scenery the .msi files will automatically access the .cab files during the process.
Step Three
This is a really important step to focus on. Regardless of your overall plan, you want to uninstall one component at a time. I’ve found this to be the least error prone way of performing an update. On your Windows gaming PC, go to Control Panel > Programs and Features. From here we’re going to uninstall the P3D CLIENT ONLY.
When prompted “Would you like to deactivate your P3D installation?”, Click NO!
Step Four
Next, we’re going to install the updated P3D Client which we downloaded in step two. As previously mentioned, after I download all the appropriate files, I create a folder on my Windows desktop and place all the downloaded files in that folder. Right-click on the Install_Client file and select Install.
Pay very special attention during the install to make sure the updated client is being installed in your specified P3D install directory. In my example, everything defaulted in just as it should have.
If you are planning to update the Content and/or the Scenery parts of Prepar3d, then return to step three and repeat the process but this time uninstall Content, then install Content and finally uninstall Scenery and then install Scenery.
Step Five
Pending everything installed successfully, reboot your PC. While the P3D update/install files will not prompt you or even require you to reboot, it is ALWAYS in your best interest to reboot after installing software and we’re wanting a trouble-free upgrade…so just reboot! Trust me, I’m an IT Guy!
Step Six
Once your Windows gaming PC has successfully restarted, launch P3D. Don’t be alarmed if P3D takes a little longer than normal to launch the first time. P3D is doing a lot of work behind the scenes and in my experience it took perhaps an additional 1-2 minutes than normal.
Step Seven
Hopefully your update was successful. Congratulations! Pat yourself on the back as you’ve just successfully updated P3D. At this point, I close out of P3D as I still needed to perform a few other updates to software accessories such as ActiveSky, Envtex, FSLabs Airbus etc.
Note: If you use Orbx Global Textures, you most likely will need to perform a Force Migration after performing an update. This is a very simple and quick process to complete. Just launch the FTX Central application. Go to Settings then look for Force Migration.
The End Result
Upon completing the client update for P3D version 4.5, I’m experiencing absolutely nothing but positive results. The P3D load time has slightly improved and I’m not seeing any noticeable performance degradation. From everything that I’ve seen, P3D v4.5 is absolutely fantastic and the enhanced night lighting actually has me wanting to fly more at night which I rarely would do in the past.
Benefits to Updating?
I’ve recently written and published an article I’ve titled “Prepar3D – To Update or Not To Update” which I discuss the benefits and also some of the concerns to updating P3D. Only you can decide if the benefits outweigh the risks. Of course, there’s also nothing wrong with waiting a few weeks until more of the add-ons have been updated for the newest version. What ever direction you decide to go, best of luck to you.
Until next time…
Happy Flying!!!
Jerry
April 17, 2019 / admin / 1 Comment
I would like to dedicate this blog post to the memory of my dear mother who passed away suddenly a few weeks ago. As a young person, she always encouraged me to write and while she really had no clue what I blogged about here (most of the time), she still read my work. I began this article back in March and after returning back from Texas have been somewhat motivated to get it finished. Here you go Mom…this one is for you.
The subject of this tutorial has been on my to-do list for many years. I began blogging about the hobby of flight simulation in September 2010 and at that time I created an Excel spreadsheet and noted a few topics I wanted to cover in tutorial style. The Basics of VATSIM was added to the growing list but unfortunately just kept getting bumped down the list. Or I would start the article only to delete it later because I just simply couldn’t convey my thoughts on the subject in a way that met my approval. I’m just funny like this…I guess I could say I’m a perfectionist and everything I’ve ever featured on my blog site has been as accurate and as detailed as I could make it given my experience and knowledge on what ever subject I’m writing about.
I was first introduced to the online world of virtual air traffic simulation even before VATSIM was born. Sometime in either 1999 or very early 2000, I signed up for and became a member of SATCO (Simulated Air Traffic Controllers Organization). However, I really didn’t do much online flying. At this particular time in my life I was busy traveling and also I must admit that I was absolutely terrified of the thought of flying online. SATCO eventually collapsed and was succeeded by VATSIM which I signed up for almost immediately. Things were beginning to slow down on the real world travel schedule and I met a few new online friends who helped me get over my fears (mainly mic fright) and BOOM…I was hooked.
The Basics of this Tutorial
As with most of my tutorial style writings, this is not meant to be the “Be All, End All” or even a absolute complete guide to the subject of VATSIM. I’m going to first encourage you to do some of your own research and reading which I’ll point out in the very next paragraph. Then I’ll share some of my own tips, tricks and perhaps some of my very own experiences. But you really need to read a few things on your own before you decide to login to the VATSIM network for the very first time. Unfortunately, unless you are a real world pilot, VATSIM is not the place to fake your way through. While VATSIM can be a very friendly and helpful environment, it’s also an extremely serious online community. More about this later.
Rules of Life
There are many rules I follow in life and the one that has worked for me, has helped me become successful in many different ways is as follows: “What you put into life is what you get out of it”. Of course, I’ll also admit (and my wife will vouch for me), I’m stubborn. Yes, a square peg will go into a round hole if you have a big enough hammer and I almost never stop to ask for directions. But I digress…
If you are a flight sim enthusiast and you are absolutely new to VATSIM, I would first recommend (almost insist) that you first do a bit of reading before you key up the mic and ask for ATC clearance at your favorite airport. As previously mentioned, VATSIM (for the most part) is an extremely friendly and helpful environment. However, it’s not the place for “on the job training”. Meaning, you should spend some time bringing yourself up to speed on the ways of VATSIM and I’m going to help you do just that.
Flight Simulation Experience
When I began the outline of this tutorial, I must admit I began writing it with the more experienced flight simulation aviator in mind. Perhaps someone similar to myself who has been flying computer based sims for many years and who truly is capable of controlling his/her aircraft both while on the ground and in the air. It’s difficult for me to explain to you just exactly how much experience you need…but will just say that if you’re not capable of operating your aircraft, familiar with basic flight navigation, don’t understand how to read SIDS/STARS charts, refuse to follow instructions/directions….then YOU are not ready for VATSIM. In other words, if you are absolutely brand new to the hobby of flight simulation and don’t recognize that a computer based flight simulation program such as FSX, Prepar3D and XPlane is MORE than a video game…then YOU are not ready for VATSIM.
However, if you have spent a few hundred hours enjoying your favorite flight simulation program, have a good understanding of flight navigation, understand how to operate your favorite aircraft, can listen and follow instruction and want to take your flight simulation hobby to the next level, then please continue reading.
Getting Started with VATSIM
Your first step should be to visit the “Getting Started” section on the VATSIM website. You’ll find a step-by-step outline for getting started with VATSIM. This one page will point you in the right direction for all things VATSIM including directing you to the Pilot Resource Center and a “must read” on Expectations and Requirements for Pilots. Again, I really can’t stress enough that the very first experience on VATSIM will be equal to exactly what you put into it in the form of self-study/research/preparation.
One of the reasons I’m encouraging you to really prepare yourself for the wonderful fun that awaits you on VATSIM, is simply…VATSIM is a really serious place. Unlike other online multiplayer communities where users seem to disobey the rules (I’m looking at you TruckersMP), the world of VATSIM is really for serious individuals who truly want to simulate the world of aviation. While I won’t lie to you and tell you that you’ll never encounter fools doing some really crazy stuff on VATSIM, they will be dealt with quickly and sharply. In my almost 20 years of enjoying VATSIM and accumulating almost 2000 hours on the network, I’ve only encountered a small handful of idiots and as I stated before, they were dealt with quickly.
Additional Tips, Tricks and Advice
Please don’t let some of what I said discourage you from giving VATSIM a try. It really is an “As Real As It Gets” experience. As you gain in experience, some of the large events which VATSIM hosts on the network will have you seeing and experiencing the crowded airspace and airports all over the world. I’m going to wrap things up here in just a few minutes, but before I do…allow me to share some additional information which might come in handy.
YouTube
Yea…if you need to know how to do something, and you can’t find it on YouTube…then you know you shouldn’t be doing it. But on YouTube you’ll find all sorts of flight simulation help (including VATSIM information).
Facebook
Yes, Facebook is more than just sharing pictures of cats. There’s actually a very active Flight Sim following across Facebook with various groups setup to help on all aspects of the hobby. There is a VATSIM For Beginners Facebook Group which is also a very good resource. But once again, I encourage you to educate yourself by reading as much as you can from the VATSIM links I provided above.
Login, Listen and Observe
One of the things I did when I first started out was to park my aircraft at a gate (never spawn directly onto a runway or taxiway) and then connect to the VATSIM network. I would locate an airport which had at least one controller and a few active aircraft and listen. This allowed me to listen to how other pilots requested clearance. There are several online resources which allow you to visually see what airports are staffed with ATC and which have active aircraft. But generally most of the larger airports will have activity throughout the day. One such site which I sometimes use is called VATTASTIC. Although my favorite is an application called VAT-Spy. It’s an application I have installed on one of my gaming machines so I can keep an eye on where ATC is staffed. Check it out!
VATSIM CRAFT Procedure
Don’t you just love acronyms? Especially when they can really help you. When requesting your departure clearance, keep the word CRAFT in your mind. Or better yet, write it down on a piece of paper. By the way…always keep a notepad and pen/pencil handy when flying online. You’ll thank me later!. The acronym CRAFT will help you in writing down all the jibberish the controller is going to tell you (which by the way you’ll need to read back). CRAFT stands for Clearance, Route, Altitude, Frequency and Transponder.
Typically when I am flying IFR (jetliner type aircraft), I’ll call up and request clearance like this. “Denver Clearance Delivery, this is American 1066 requesting IFR clearance to Dallas/Ft. Worth as filed. I have information Bravo”.
The readback I receive from ATC will fall into the CRAFT format and may sound something like this:
American 1066, you are cleared to the Dallas/Ft. Worth Airport (Clearance) via the STAKR4 Departure PYPER Transition (Route), Climb and Maintain 10 Thousand…expect Flight Level 350 10 minutes after departure (Altitude). Departure Frequency 128.45 (Frequency) , Squawk 2145 (Transponder).
Aviate, Navigate and Communicate
Things can get pretty hectic when flying online. Remember, in the real world…airliners are flown by TWO pilots who share the work load. On VATSIM, all the same amount of work is handled by just ONE pilot, YOU! Regardless of how busy and hectic things become (and it does get easier with practice) always remember this tip. Aviate, Navigate and finally Communicate.
Aviate – Always maintain control of your aircraft. This is first and foremost.
Navigate – Know where you are, understand the terrain and obstacles around and below you.
Communicate – Finally…communicate. As you gain more and more experience, you’ll be able to multitask like a pro. But until that time comes, always make sure you begin executing all ATC instructions before you communicate with ATC.
Help is Here VATSIM First Wings Event
I realize a few paragraphs ago I said VATSIM isn’t the place for “on the job” training and I encouraged you to read all you can and familiarize yourself as best you can before you show up and try to muddle your way through the procedures. While I absolutely encourage you to follow this sound advice, VATSIM does conduct various events around the world to help brand new virtual pilots. These events are called “VATSIM First Wings” and they are absolutely geared to help the beginner online pilot. While I would still encourage you to read everything you can and also be fully capable of flying your aircraft (this event isn’t geared to teach you how to fly). Then show up at the appropriate time, location and be ready to learn.
The next VATSIM First Wings Event is quickly approaching and will take place on 27 April 2300 – 0200z at these featured airports KRST (Rochester), KRFD (Rockford), KCID (Eastern Iowa) and KDLH (Duluth Intl). You can learn more about this upcoming VATSIM First Wings event here.
Other Online Options
Yes, there are other online multiplayer options available. I chose to write about VATSIM as that is my preference and the one I have the most experience and longest history with. Just last year I wrote about all the various online multiplayer options available for flight simulation. The information in this article is still current today.
Final Thoughts
If you’ve reached this point and you’re thinking to yourself, “VATSIM sounds like the last place I want to be” that was not the intention. However, I can’t stress enough that VATSIM is a serious online community of likeminded individuals who all share a passion for aviation and we’re all after one thing….”An As Real As It Gets” Experience of interacting with Air Traffic Control and other Aviators. It’s really that simple.
There’s a WHOLE lot more information that I would love to share and will do so in the future. Flying on VATSIM is not something I do each and every time I fly. However, I do very much enjoy the enhanced immersion it provides. For me, I’m really not interested in the HUGE events such as Cross the Pond. I tend to favor smaller events where the balance between ATC and pilots better mirror real world operations. Regardless whether you enjoy flying small GA aircraft, small to medium sized tubeliners or the giants of the sky hauling passengers or freight from one side of the world to the other, VATSIM really does something for everyone. I hope you’ll check it out and I hope this tutorial has helped motivate you to do so.
Until next time…
Happy Flying!!!
JT
September 17, 2018 / admin / 0 Comments
As a follow up to last weeks article on “Learning a Study Level Aircraft”, I thought I would follow it up with my recommendations for your first payware, study level aircraft purchase. Because not all virtual pilots are interested in jet tubeliners, I’m going to throw out two recommendations with the first being a GA or General Aviation type and the second being a jet tubeliner.
The Fine Print
The recommendations I will provide are add-ons that I own and enjoy very much. Neither are overly complicated assuming you approach both with an understanding that their operational characteristics vary greatly from the freeware/default type aircraft you may be accustomed to flying. In addition, I will also just (as a reminder) encourage you to conduct your own research just to make sure your PC meets the recommended specifications to run the payware add-on aircraft. While it really makes very little difference regarding the flight sim platform you use (FSX, FSX:SE, P3D v2, P3D v3 or P3D v4) just keep in mind that if you are running something other than P3D v4, you may be required to repurchase the add-on when/if you upgrade. Let’s get started…
A2A Cessna 172 Trainer
I’m almost of the belief that every virtual pilot should own this aircraft. I think it just makes sense. After all, pretty much all the basics of flight can be learned and that knowledge finely tuned in this aircraft. The A2A Cessna 172 Trainer is available from A2A Simulations and most will agree is the finest study level general aviation aircraft you can purchase. Depending on your sim platform, this wonderful aircraft will run you from $49.99 – $79.99. The A2A Cessna 172 Trainer is feature rich and designed to be flown by the book. I’ve spent hours and hours and several more hours just flying around. It’s the perfect airplane for really taking in all the eye candy available in Orbx sceneries.
PMDG 737NGX
My readers shouldn’t be surprised that the PMDG 737NGX is my recommended and truly “must have” jet tubeliner. Much like the A2A Cessna, the PMDG 737 is one that should be in everyone’s virtual hangar. Yes, I know it’s extremely difficult to perhaps not choose the beautiful PMDG Queen of the Skies Boeing 747-400 or the incredibly beautiful PMDG Boeing 777. Likewise, the QualityWings Boeing 787 Dreamliner is also gaining a lot of traction in the community. But if you’re a Boeing fan, and you are interested in jet aircraft…then the PMDG 737NGX really should be in your hangar.
Once you master the 737 and understand the “Boeing Way”, the rest of the Boeing family of aircraft will almost be a piece of cake. The other advantage with starting with the NGX is this aircraft truly is the workhorse in the airline industry. Just about every major airline has (or have had) a fleet of Boeing 737’s and it’s the perfect short to medium haul aircraft.
Depending on your flight sim platform, the PMDG 737NGX (-800/900) will run you $69.99 – $89.99. The 737-600/700 expansion will run you another $24.99.
In Summary
As I often say, there’s no right or wrong way to do things. The hobby of flight simulation is no different. There are virtual pilots who only prefer general aviation and there are those who only enjoy flying the jets. Of course, there are lots who enjoy both and the A2A Cessna 172 and the PMDG 737NGX are the best in class for these two flight sim areas. Get one or get both and enjoy the experience. Thanks for reading!
Until next time…
Happy Flying!!!
Jerry
September 3, 2018 / admin / 0 Comments
This will serve as the introduction and first of a multi-part blog tutorial series for how I learn and fly sim aircraft that might be classified as the more complex, study-level, payware aircraft types. While some will argue that products developed by QualityWings, CaptainSim, Carenado, Aerosoft (just to name off a few) aren’t in the same category or classification as the likes of PMDG, A2A or FSLabs. While I agree partially with this argument, there is still a learning process with these different aircraft models and more or less the same method I use can be applied to each of them.
The Fine Print
I’m sharing the methods I use to learn and fly study level aircraft. This series of tutorials are not designed to be the end-all, be-all of methods to accomplish this task. These are simply the methods which have worked well for me over the years. Actually, the process has become a lot easier since the dawn of YouTube and Google. If you have different methods that work, great. Likewise, if you prefer to first start by studying the Boeing manual…I take my hat off to you. However, many of us just don’t have the time, nor the desire to go to the full depths of understanding when it comes to “when I flip this switch in the cockpit, this is what is happening behind the scenes with all the complex theory behind it” type scenario. As I have stated many times…I have no desire to learn how to fly a plane in real life. But I get a lot of stress relieving satisfaction from the time I spend in flight sim and the other simulation based platforms I enjoy. There’s nothing wrong with any method. Let’s get on with this first tutorial.
The New Aircraft
So PMDG, FSLabs, QualityWings etc. have released their latest and greatest version of whatever real world airplane they’ve been spending years developing. This new virtual aircraft is the closest thing us flight simmers can experience to the real thing short of spending time in a full-size simulator or becoming a real-world airline pilot. Almost every button, switch, dial in the cockpit has been programmed to simulate the same real-world operation we’d find on the real flight deck. It’s truly a thing of beauty…but, just like in the real world…a series of steps must be carried out and in most cases these steps must be followed in a specific order before we’ll ever get the aircraft into the skies.
I don’t know about you, but when I first purchase, download and install the latest and greatest from my favorite developers the first thing I really want to do is fly the darn airplane. While I absolutely love flying on the VATSIM network, I’ll never fly a brand new aircraft until such time as I’ve learned more about the aircraft and can perform all the necessary functions as not to embarrass myself on the network or more importantly, not cause any disruption or dissatisfaction with other pilots.
I’ll be open and honest, in the beginning for each new aircraft I’m just concerned with the minimum effort needed to get the aircraft in a state where I can fly it, control it and land it. Once I can do this….I then proceed with diving a little deeper and deeper into the aircraft. As time goes by, I’m following more of the “checklist flows” for how things are done. Once I reach this point, this is when I’m willing to use the new aircraft on the VATSIM network.
Over the course of the next few written tutorials, I’ll share the steps I follow to learn these new aircraft and to develop a proficiency at flying them well enough to fly online. As I’ve stated in the past, I’ve been flying on VATSIM from the very beginning. I have over 18 years of online experience, I’ve never been banned, I’ve never been given a warning. I take great pride in always being professional and always following the rules.
But how do I begin the learning process?
Read the Manual
Yes…it starts with reading the manual. I’m sure you’re probably thinking to yourself, surely (don’t call me Shirley) Jerry has figured out a better process to all this versus reading the manual. Well…all I can say is the manual generally has a lot of valuable information that will assist you in the process of learning your new aircraft. But even I’ll admit that a lot of the information contained in these manuals provide more of the theory behind how things function versus the how do I do this and why should I do this procedure. But at the very least….know where the manual is located (where it’s been installed on your PC) and familiarize yourself with it. It’ll make for great reading material during the cruise phase of your first flight.
Tutorial Flight
Most complex, payware aircraft will include a tutorial flight. As I begin laying out the framework of this article (early July timeframe), I’m in the process of learning the FS Labs Airbus A320 (and the A319). I’m relatively new to the FSLabs Airbus and you can read more about my decision to purchase this add-on here. The tutorial flight for the A320 is a short flight from Vienna, Austria to Copenhagen, Denmark. It’s written in a step-by-step fashion and can very easily be followed.
For as long as I can remember, I’ve always learned by doing. I can sit in a classroom listening to someone explain something until my eyes glaze over and not learn a thing. Or I can actually roll up my sleeves and follow along by actually doing the same thing the person is talking about and learn everything I need to know. Well, learning how to fly is the same thing for me. The FS Labs tutorial flight is one of the best documented processes I’ve seen and after flying this flight twice, I was ready to fly to other destinations using the processes documented in the tutorial.
YouTube is your Friend
The first complex payware aircraft I purchased was the Level-D 767. This aircraft came out before YouTube was born and I must admit that the learning curve for the 767 (for me) was much steeper than any other aircraft since the dawn of YouTube. Prior to the 767, I was a CTRL-E kind of guy. So trying to follow along in the manual (and I can’t remember if there was a tutorial) was much like trying to fly to the moon. But now days, within days (sometimes hours) of an aircraft release, you’ll find really detailed videos from very talented individuals on full, immersive flights.
Some YouTube content creators will go over the flow based on the provided checklists and others will hit the highlights of just what’s needed to power up the aircraft and fly it. As I previously mentioned, I’m more inclined to initially take the path of least resistance in the beginning. But there are a few real world airline pilots who also record YouTube videos and stream on Twitch while flying in P3D. I thoroughly enjoy watching their content, especially once I’ve somewhat mastered the basics and it helps me to then go back and fill in some of the areas I’ve either missed or perhaps just don’t understand why a process is done.
Checklist Flows
Once you’ve completed the tutorial flight(s) and have a better understanding of your new aircraft. Future flights are easier and setup a lot faster when using a checklist. Again, most of the developers will include a checklist within the documentation of the aircraft. However, in some cases these checklists when used without any additional aids may not be enough to get you over the learning curve. This is where my modified checklists come into play.
Modified Checklists
Generally after a few tutorial flights, then a few flights loosely based on the tutorial flight, I begin creating my own checklist flow. I do this for a few reasons. One, in some instances there are steps on the official checklist that just don’t provide enough details as to the steps I need to follow. For example, in the FSLabs A320 checklist provided in the documents, the first checklist item in the Before Start section is “Cockpit Preparation”. What does all this entail I ask? To a veteran airline captain or first officer, they know all the finer details behind all that goes into this important checklist item. But for me…it’s simply not enough…at least not in the beginning stages. So I’ve developed a method of creating my own Word document lists which somewhat mirror the actual A320 checklist, but at the same time helps me to remember everything I need to do to ensure the cockpit is fully prepped. In addition, when I lay out these flows, I try (as best as possible) to follow a flow that works best for me. Yes, I realize this may deviate from how things are done in the real world. But if it keeps me from having to bounce all around cockpit then that just saves me a little time. And honestly, we’re not talking about major differences…just a few shortcuts here and there. I may consider making an effort to clean these documents up and make them available to anyone interested.
Just to repeat myself
There’s no right or wrong way with these things. Yes, there are those “hard core” types that actually dress up like a real pilot to enjoy their computer based sim. But the thing everyone needs to keep in mind is that what we’re simulating…the workload and role of an airline pilot in the real world is carried out by two highly skilled pilots. Unless you are using an aircraft capable of shared cockpit functionality, you’re really doing all the work typically shared between two pilots. There are add-ons available for some payware aircraft which simulate a multi-crew experience. FS2Crew is one that I’m most familiar with. The add-on is capable of performing various tasks on the flight deck using voice recognition. I’ve used it in the past on the Level-D 767 and one or two of the PMDG aircraft I own. While I’m no longer using it, I certainly recommend it if you’
Final Thoughts
The old saying, “Practice Makes Perfect” is certainly a very wise suggestion. The more you fly your brand new aircraft, the easier it will be to commit all the steps necessary to memory. But remember, even real world pilots use a checklist for each and every flight so don’t feel bad if you (from time to time) need to reflect back to your checklist. It’s just all part of the process. Finally, for the sake of all others (and your own reputation)….spend a little (or a lot) of time flying your new aircraft off-line to familiarize yourself with it fully before contemplating going online with VATSIM, IVAO or the other online networks.
I hope this information helps you.
Until next time…
Happy Learning!
Jerry
July 9, 2018 / admin / 0 Comments
As my readers will know, a few months ago I experienced a total PC meltdown/failure of my gaming PC. I went through my normal process of designing, acquiring parts and building my new gaming rig. I won’t deny that the timing of this build was not good, but it was necessary as I had no other PC capable of delivering the performance I need with the games I enjoy.
Question Time
I’ll share my thoughts, ideas, suggestions etc. on the very subject of this blog article shortly, but as with many of my writings, I like to get my reader thinking about a few things first. So basically the main question you need to ask yourself is for what is the purpose of this new computer you are contemplating buying or building? Now one might think the first and perhaps only question one might need to ask is whether you believe you have the ability to build your own PC. While this is an important question to ponder, at least for now…this blog article IS NOT going to be about how to build your own PC, just whether or not you should (or at least consider the option). So, for what purpose will you use this new PC?
Now one might think the only folks that may stumble onto my blog site or read my writings on other websites are gamers. I’d wager to guess that gamers do make up 95% of my readership, but with the power of SEO….someone, anyone could perform a Google search and end up reading this article whose interest is not gaming. Let me share a few thoughts about the non-gaming and non-performance driven user first.
Basic PC User
In the event you are a non-gamer, non-performance driven PC user and you’ve stumbled onto this writing…WELCOME! Thank you for reading! If you are merely in the market for a new PC simply for web use, word processing, accounting and stuff like that, then you may very well be a candidate for an “off the shelf” store purchased PC. At the end of the day, you might actually save some money this way. Brand named PC’s are available just about everywhere and often bundle deals can be found where you can walk out of the store with a new PC, monitor, printer and even bundled software options that when all considered together do make this the less expensive (and certainly less frustrating) option.
In the real world, I’m an IT Professional. While most of the systems my group deploys are laptop computers, even the desktop PC’s we deploy are store bought models. Yes, we get volume discounts….but the time saved in simply being able to open a box and deploy versus build just can’t be overlooked. Do your homework, shop around and I’m sure you’ll find everything you need.
Another option for the basic PC user to consider is purchasing a laptop computer. Many years ago, laptops were typically only for the wealthy business traveler. But in today’s world, an excellent range of brands/specs can be found and if you would like the flexibility to user a computer just about anywhere, then a laptop PC might be the best choice for you. However, I do invite you to continue reading.
Desktop versus Laptop for Gaming
Before I dive into the world of gaming PC’s and gaming PC components, let me just state the following. While I just suggested a laptop PC might be an excellent choice for the non-gamer, non-performance driven individual, I simply can’t recommend any laptop for the serious gamer. Even a “Gaming” branded laptop will have limitations in what can and can’t be done with that platform. I’ve witnessed too many examples where an individual has shelled out thousands of dollars on a “Gaming Laptop” only to find out they can’t play their favorite games after all. This is especially true if you are working on a tight budget and perhaps you can’t afford the top of the line machine. Laptops offer very little upgrade opportunity and as a result, they don’t hold their resell value very well.
I fully understand budget constraints when planning a new computer purchase. I also understand some folks just can’t afford to have two PC’s and often times a laptop purchase becomes a requirement (students etc.). If this situation applies to you, then I suggest purchasing the very best gaming style laptop you can afford and just understand you’ll most likely have to compromise when it comes to graphic settings in order to get solid performance. Remember, the bottom line between any gaming laptop and the equivalent desktop is portability over performance.
One final comment or perhaps a word of advice if you truly must go down the road of purchasing a gaming laptop. Just because the word “lap” is used to describe this type of computer, don’t even think of trying to game with it in your lap. You’ll need to place the laptop on a hard surface (table/desk) and I would also highly recommend purchasing a cooling pad. Not only will this fairly inexpensive accessory help keep your laptop cool, it will also help to extend the life of the laptop. Remember, heat kills.
Performance/Gamer User
The performance driven or gamer type user is a unique breed of user. Computer based tasks such as video editing/video production, CAD Design and gaming have a very similar requirement. Often the need for a lot more horsepower than what can be found in a brand name, store purchased PC. Yes, there are some major brand computer manufactures designing, building and distributing “Gaming Machines”. But in my opinion, these are much, much more expensive in the long run and often come bundled with a lot of extra software which really is never needed or even wanted. This is why a custom built PC will almost always be the less expensive option. In addition, a custom built PC might also allow the consumer to build something on a budget and down the road upgrade a few components.
A Real World Example
The new gaming PC which I recently built, is my dream build. Perhaps for the first time, at least in a long time…the machine is exactly what I want it to be. In other words, I’m not skimping on anything. From a hardware perspective…this machine is state of the art with all the latest and greatest available hardware (at the time of build) and will serve me (as built) for hopefully 5 years. Even my previous build I went with a lower end graphics card and upgraded to the 980Ti about a year later. Not this time.
While I always planned to build this new machine myself, I’ve taken the time to do a little research just to see how much I’ve saved overall by building the machine myself. I’m pleased to say (and my wife is pleased to hear) that I’ve saved over….(drum roll please) ONE THOUSAND DOLLARS. Yes…over $1,000 I saved by doing the job myself.
But time is money right? It sure is. I’ve invested perhaps 4-5 hours of my time planning, tweaking, researching my build, more tweaking, ordering parts and perhaps another 3-4 hours to assemble and complete the hardware build. So let’s call this 10 hours. But for a geek like me, it’s been 10 hours of reading reviews, watching some videos and basically feeling like a kid in a candy shop. Bottom line, it’s been a fun process. It’s something I enjoy doing and I consider it to be an extension of the gaming hobby.
But you’re an IT Guy, I’m not!
In today’s world, even a non-IT person can design and build their own gaming PC. YouTube and Google are both excellent resources in helping the non-IT Professional in this area. There are also websites such as PCPartPicker which can assist you in designing the build and can help ensure individual parts compatibility. After all, not all PC parts are created equal. Another alternative is to copy cat another build. For example, you can view all the individual hardware components I used in my recent build here. I ordered all my individual PC parts from Amazon, CDW and Newegg.
Intel versus AMD
The Intel versus AMD debate may be as confusing as Coke v. Pepsi, Ford v. Chevy or Prepar3d v. XPlane. Folks have their preferences and for the record my choices are Intel, Coke, Ford and P3D…but I digress. Most of my readers may know that I’m a long time flight simmer and really have only branched into other simulation based games in the past 3-4 years. But I made a really costly mistake about 10 years ago when I made the disastrous switch from Intel to AMD CPU’s. While I can’t specifically speak towards AMD performance with games such as Farming Simulator, Euro Truck Simulator 2/American Truck Simulator, I can say that just about every flavor of Flight Simulation software I’ve ever used performs far, far better on an Intel CPU than the AMD equivalent. So I would highly suggest you research this topic carefully and when in doubt, make sure Intel is inside. You’ll thank me later. Especially if you’re a flight simmer.
SSD versus HDD
I suppose I could have listed this topic in the above section when talking about debates, but really there isn’t much of a debate regarding SSD versus HDD performance. If your budget allows, you’ll appreciate the performance gain when choosing an SSD over an HDD. If your budget permits, go with multiple SSD’s and perhaps one HDD. Install Windows on its own SSD (recommended 250GB) and on a second SSD install your games and any other supporting applications. If you record your gaming content on a frequent basis, consider installing a fast HDD for this purpose.
Air or Liquid Cooling
As CPU’s have increased in speed over the past several years, the need for liquid cooling has become more important. When I built the beast version 4 about four years ago, I installed an inexpensive water cooled CPU cooler. This cooler only lasted about 6 months and nearly caused my CPU to meltdown before I realized I had an issue. I replaced it with a air cooled CPU cooler as that was what I was used to using. However, as I began researching the new build and specifically how best to keep the Intel i7 8700K cooled, one CPU cooler kept coming up in all the reviews and that was the Corsair Hydro Series H100i v2. I decided I would give a liquid CPU cooler another try and I’m really glad I did. I still frequently monitor my CPU temps just to be on the safe side, but it really keeps my CPU temps nice and low and as I mentioned before….Heat Kills!
Overclock???
The subject of overclocking is a highly debated topic. To be perfectly honest, I’ve overclocked my builds in the past and rarely see a performance difference. Especially when I weigh what little performance gain I might experience versus the added stress caused by the OC’ed components. Remember, Heat Kills!
Budget Build Today, Upgrade later
As I mentioned in the laptop versus PC section, a laptop (gaming or otherwise) offers very little in the area of down the road upgrades. Also, gaming laptops just don’t retain their value. Also as previously mentioned, I’ve built gaming PC’s on a budget and upgraded components at a later time. The issue with my last PC was a motherboard failure, but all other components were just fine. I managed to sell my 980Ti for just a few hundred dollars less than I paid for it. So keep that into consideration and if you are building on a budget and plan to upgrade some parts down the road, make sure you keep the original box. You’d be surprised at how much more you can make from selling used parts when you have the original box, user manual and any other accessories.
In Closing
I know this article doesn’t cover everything you need to consider with regards to building or buying your next computer. But hopefully I’ve addressed some of the key areas to consider and really I truly believe that just about anyone can build their own PC these days. Just do your research and read the instructions. Seek out assistance via YouTube and Google, take your time….and enjoy the process. When it’s all built and you power it up for the first time, you’ll experience a level of satisfaction that’s hard to beat and just think about all that money you’ve saved which can be used to buy more games.
Until next time….
Happy Building!
Jerry
June 27, 2018 / admin / 4 Comments
There seems to be a lot of confusion regarding the process of how to update Prepar3D. While the geniuses at Lockheed Martin have created a super easy to follow instruction manual, the confusion regarding this process seems to run rampant on social media. I’m not sure why really. Perhaps it’s the reluctance of reading the manual or perhaps the manual just contains too much detail and not enough step-by-step-by-step guidance. In any event, I’m going to do my best to provide you a step-by-step guide for how to update Prepar3D. Or at the very least, how I update my own instance of Prepar3D.
About this guide
This step-by-step guide was written specifically for the Prepar3D version 4.2 to 4.3 update and written/published in late June of 2018. Lockheed Martin released P3D v4.3 on 25 June 2018. If you are referring to this guide anytime after version 4.3 (v4.4, v4.5 etc.) then this method should also work as well. Unfortunately my crystal ball isn’t working for peering into the future, so who knows how the update process will work for P3D v5 (if there is such a thing). What I’m trying to say here, is content on the Internet tends to live forever and you might be stumbling on this writing a year, two or more from the time I wrote it. Just keep that in mind.
The Update Process
Just a little background for those that may not be aware. I believe, starting with P3D v3.x, Lockheed Martin developed P3D to be somewhat modular in the way one can update and maintain the simulator. This modular setup consists of three main files with the first being the Client, the second being the Content and the third being the Scenery. When Lockheed Martin develops, tests and deploys an updated version to us, we no longer need to completely uninstall the entire P3D application just to take advantages of the updates. In many cases, only the “Client” portion of the update needs to be applied. But you should do your homework to best determine exactly what you need to update to take advantage of all the new bells and whistles available.
Prepar3D version 4.3 Change Log
To aid you in understanding all the changes included in the P3D v4.3 update, please follow this link. Use this information to determine what you want to update.
My Update Process
I’ve studied the change log and have determined my action plan. In short, I don’t see enough value add in the Scenery updates to worry at this time with updating. That’s really the beauty of this modular update system. However, I will of course update the client and also the content. If you are not interested in flying the six different versions of the C-130, then I suppose you can simply skip the content portion. But as I previously stated, my update plan is to update both the client and the content portion of P3D.
Step One
Make note of P3D Settings. Before I perform an update, I typically will start up P3D and take screen captures of all the settings screens. This way, if anything gets changed during the update process…I’ll be able to quickly reset everything back to the way it was before. I like to run P3D with the updated version with the same settings I ran on the previous version first, before tweaking anything. This way I have a better determination on just what improvements were made and how these improvements impact my setup.
Step Two
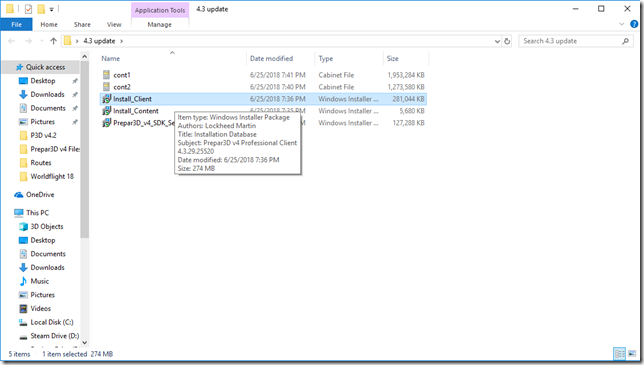
Download the update files required. As I previously mentioned, I’m only planning to update the Client and the Content. So you’ll need to login to the downloads section of the Prepar3D website with your license or account credentials. Once there, click to expand the individual component downloads section and download the following four files: Install_Client.msi, Install_Content.msi, cont1.cab and cont2.cab. Once downloaded, I typically place all the files into a new folder I create on the Windows desktop for ease of access.

Step Three
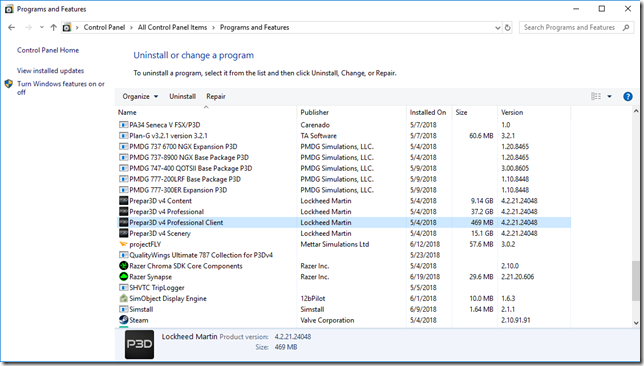
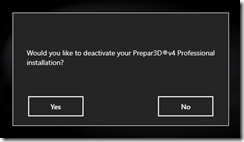
We’re going to uninstall one component at a time. I’ve found this to be the least error prone way of doing this. On your Windows gaming PC, go to Control Panel > Programs and Features. From here we’re going to uninstall the P3D Client ONLY.
When prompted “Would you like to deactivate your P3D installation?”, Click NO!
Step Four
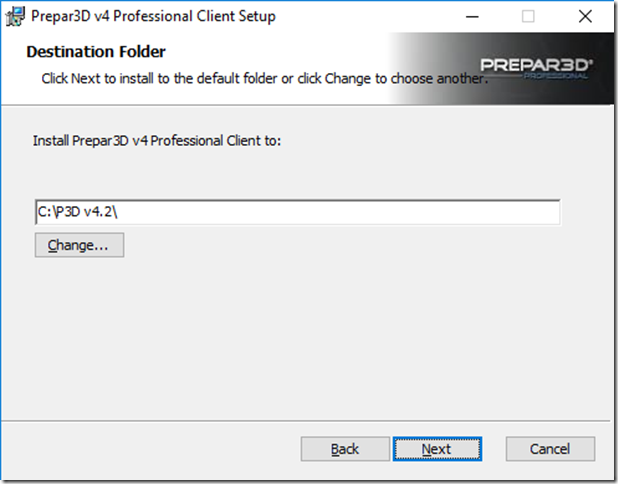
Next we’re going to install the updated P3D Client which we downloaded in step two. As previously mentioned, after I download all the appropriate files (in this case four), I create a folder on my Windows desktop and place all the downloaded files in that folder. Right-click on the Install_Client file and select Install.
Pay very special attention during the install to make sure the updated client is being installed in your specified P3D install directory. In my example, everything defaulted in just as it should have.
Step Five
Return to Control Panel > Programs and Features and locate the P3D Content component and just as you did before, uninstall this component.

Step Six
Again, as before…right-click on the Install_Content file and click Install. The Install_Content installer will automagically access the two cab files (cont1 and cont2) as necessary to perform the updated content installation.

Step Seven
Pending everything installed successfully, reboot your PC. While the P3D update/install files will not prompt you or even require you to reboot, it is ALWAYS in your best interest to reboot after installing software and we’re wanting a trouble-free upgrade…so just reboot! Trust me, I’m an IT Guy!
Step Eight
Once your Windows gaming PC has successfully restarted, launch P3D. Don’t be alarmed if P3D takes a little longer than normal to launch the first time. P3D is doing a lot of work behind the scenes and in my experience it took perhaps an additional 1-2 minutes than normal.
Once P3D launches, pay special attention to the screen below. If all was successful with your update, you should see the new “Add-ons” button at the bottom. If so, SUCCESS! Pat yourself on the back as you’ve just successfully updated P3D. At this point, I closed out of P3D as I still needed to perform a few other updates to software accessories such as ActiveSky, Envtex etc.

Additional Notes of Interest
I’m writing this just a little over 24 hours from when Lockheed Martin released the update for Prepar3D v4.3. At the time of this writing, third party developers are working hard to update all the various add-ons which required some level of change due to the new P3D update. Within just hours of the P3D update, ActiveSky, Chaseplane, Envtex/Envshade all had updates available for P3D v4.3. Once I updated these add-ons, these along with all my other 3rd party add-ons work including all my PMDG aircraft, QualityWings 787, A2A aircraft, Carenado aircraft and sceneries including Orbx, FlightBeam, FSDreamTeam etc. etc. all worked as expected. In other words, I did not need to reinstall any add-ons.
Benefits to Updating?
After I managed to get everything updated and launched P3D, I noticed a much faster load/launch time and I’m seeing a very slight increase in FPS performance. The amount of time it took me to perform the update process was about 15-20 minutes. But I can certainly understand ones reluctance to updating…especially if your current v4.2 setup is running stable. To my knowledge, no 3rd party add-ons at this particular time require version 4.3. However, if you’re an Aerosoft Airbus fan and are anxiously awaiting the release of the A318/A319 and A320/A321, then you may need to update to 4.3. But as the release date for the Aerosoft Airbus has been pushed to sometime in mid-late July, you have plenty of time.
Final Thoughts
Over the past 24+ hours I’ve seen a lot of frustration from others who have attempted to update P3D to 4.3. This is one of the reasons I decided to document my update process in the hopes it helps others. However, let me say this. My gaming PC is 100% rock solid. I was experiencing zero issues before deciding to update to v4.3. P3D v4.2 was stable and the only CTD I’ve experienced was caused by the wx radar in the QW787. If you’re experiencing issues with your gaming machine, if you’re experiencing issues with Windows on your gaming machine and especially if you’re experiencing issues with v4.2, then your upgrade/update process may not go as smooth as mine did. While this process is super simple (especially following my method), it won’t solve problems which exist in your system. These problems (what ever they may be) may result in a less than desired outcome.
I wish you the very best of luck. I truly believe if you follow my guide step-by-step as I’ve laid it all out, you’ll have the very best chance for a successful update. Again, the best of luck to you and I hope to see you in the virtual skies very soon.
Until next time….
Happy Updates!
Jerry
P.S. After I have more time to spend flying in P3D v4.3, I’ll post an updated settings post. I don’t anticipate anything changing, but need to update the page anyway.
July 8, 2017 / admin / 0 Comments
Just for clarification, my blog articles are geared towards the new flight sim enthusiast. 2017 is “The Year of Flight Simulation”. With new and updated flight sim platforms from Lockheed Martin (Prepar3d v4), Laminar Research (X-Plane 11) and the new kid on the block Dovetail Games (Flight Sim World)…a lot of hype (very good hype) has been focused on our wonderful hobby. If you build it, they will come…is just as fitting on the flight sim scene today as it was years ago in that Iowa cornfield.
Today’s “How To” article is designed to help the new virtual pilot understand the differences of VFR and IFR flight rules as they relate to the flight simulation hobby. But before we get started and to satisfy the attorneys….allow me to post the fine print.
Fine Print: Unfortunately I feel the need to state for the record that my “How To” articles and tips are for flight simulation purposes only and should not be used for real world aviation.
Now that we have the legal stuff out of the way…let’s get started!
The Flight Rules
There are two sets of rules for flying and operating aircraft. VFR and IFR. The choice between these two sets of rules is generally determined based on weather conditions. However, other factors may come into play such as flight operations, type of aircraft and terrain/border considerations. But before we dive into these specific sets of circumstances, let’s clear the air on exactly what VFR and IFR means. Let’s start with IFR first.
IFR
IFR stands for Instrument Flight Rules and is a set of rules that govern aircraft which fly in what is considered Instrument Meteorological Conditions (IMC). IMC, in general terms, just means flying in the clouds. More to the point, IMC weather conditions are defined as weather that is below the prescribed minimums for VFR flights.
Essentially, under IFR flight or IFR flight conditions, the pilot or pilots will operate and fly the aircraft by instruments without any outside visual guidance. In the real world, pilots who wish to fly IFR are required to possess an instrument rating and required to undergo additional training.
VFR
VFR stands for Visual Flight Rules. Just as the name implies, VFR flight rules require the aircraft must, at all times be clear of any weather situations which would prevent the pilot from maintaining visual separation with other aircraft, terrain, obstacles etc. While some VFR flights may be under radar coverage by ATC, under VFR the responsibility for traffic separation lies solely with the pilot in command.
Other Considerations
While weather certainly plays a crucial part in determining whether one flies VFR or IFR, also the type of aircraft, the type of flight operations being conducted and also general terrain and border considerations must be factored in. Of course, the other really important factor is pilot rating/certifications. However, pilot rating/certifications are not applicable in the virtual flying environment.
Simply put, unless the pilot holds an instrument rating…if weather conditions are not VFR (meaning they are classified as IMC as discussed above) then the aircraft and the pilot will remain firmly in place on the ground.
The type of aircraft also carries an important factor in the decision. Something like a J-3 Cub with no lights and no radios will remain grounded under non-VFR conditions. At a minimum, (along with pilot certification) any aircraft filing for IFR flight must have two-way radio communication capabilities, a transponder and navigation equipment.
Any sort of scheduled passenger flight operations will require an IFR flight plan to be filed and the pilot/aircraft must fly under IFR flight rules at all times. The exception to this rule might include certain charter operators, but for insurance purposes even these may be required to always operate IFR. Obviously all large jet aircraft will generally file and operate IFR.
Finally, depending on terrain and altitude restrictions, these type of flights might be IFR type. Also, crossing of international borders will also most likely require an IFR flight plan.
Fine Print: Unfortunately I feel the need to state for the record that my “How To” articles and tips are for flight simulation purposes only and should not be used for real world aviation.
Again, while much of what I’ve discussed above comes directly from real-world aviation rules/guidelines, I just want to remind readers this information is not geared towards real world aviation.
Virtual Flying – IFR or VFR? What is most common?
In the virtual world, and specifically speaking about the virtual multi-player networks of VATSIM and IVAO, the most common type of flight operations are IFR. While both networks welcome and encourage VFR flying, the most common will be IFR.
Even yours truly, got started on VATSIM flying IFR and of the almost 2000 hours I’ve logged flying on the VATSIM network, I’d guess that 95% of those hours will be under IFR. As someone with over 17 years of VATSIM experience, if there is any regret I have today, it’s that I didn’t do more VFR General Aviation type of flying on the network to gain a better understanding of the key functional differences between the two.
What’s Next?
This really is only scratching the surface and this article is really only providing the explanation and differences between IFR and VFR flight. In a future set of articles I’ll provide more clarification specific to IFR and VFR flying as it relates to virtual flying on the various online, multiplayer networks.
Until next time…happy flying!
Jerry
Fine Print: Unfortunately I feel the need to state for the record that my “How To” articles and tips are for flight simulation purposes only and should not be used for real world aviation.
July 1, 2017 / admin / 0 Comments
Much of these early “How To” blog articles are dedicated to understanding some of the basic knowledge required, as we progress I’ll include some additional and more advanced “How To” information. At this time I’m assuming you are still very much new to the hobby of flight simulation. If you have been following my “How To” articles, you may recall I’ve suggested on more than one occasion to start with the default Cessna (or some other single engine, light aircraft) and work your way up. In my opinion, this is important and shouldn’t be overlooked. As in the real world, an individual just doesn’t walk off the street and learns to fly a Boeing 747. They start off in a much, much smaller aircraft.
The principle of flight is the same regardless of aircraft type. Regardless if you are flying a Cessna 172 or a Boeing 747, you must taxi, takeoff, climb, cruise, descend and land the aircraft. Again, the process is much the same….but one major difference is in the speed at which you accomplish these tasks. It’s easier to learn the basics in a slower and more forgiving aircraft like the default Cessna 172. But certainly as you master these tasks in the Cessna it really is just a matter of applying the same principles as you progress to larger and more complex aircraft.
I know there are some (perhaps many) who have no desire to fly the heavy jets. Likewise, many of you once you get the hang of flying may never fly anything smaller than a Boeing 737. This is of course the beauty of our hobby. There truly is something for everyone.
At some point if you want to try to fly the heavy jet aircraft, I would suggest you start with the default Boeing 737. The Boeing 737 has been a featured default aircraft of Microsoft Flight Simulator since FS95 and is an easy aircraft to learn.
Tip – When starting to learn how to fly the heavies, stick with the default aircraft. While these default aircraft models may lack the sophistication of their real world counterpart, the up side in learning is that they lack the sophistication of their real world counterpart. Said another way, the default aircraft modeled in Flight Simulator are more forgiving and much easier to fly than the study-level, payware models such as PMDG.
Much as I did in the article titled “Your First Flight”, I suggest you load up the default Boeing 737 and head out to KEDW (Edwards Air Force Base). Our goal is to spend time getting to know the flight characteristics and differences of the Boeing 737 (compared to the Cessna). I highly suggest following the same steps of concentrating on taxi, takeoff, climb and cruise at first. As you’ll quickly get the hang of that (since you’ve been practicing and mastering the Cessna), then add the descent and landing phase. Just follow the pattern shown in the image below until you get it right.
Until next time…
Happy Flying!!!
JT
June 20, 2017 / admin / 0 Comments
A few weeks ago I shared with you all the choices you have available in the form of flight simulation software. While you certainly have many options, the majority of my experience and what I will discuss throughout these tutorials will be how it all relates back to Microsoft Flight Simulator/Prepar3D. Regardless of your choice, once you get it installed the next step is to take that first flight.
While it may be tempting to load up the default Boeing 747 and depart from KJFK in New York and fly to London Heathrow. If this is your first time in a computer flight simulator, please allow me to provide some advice and encourage you to wait a little while before you jump into the big jets.
Remember, a normal aircraft flight includes several parts of flight including taxi, takeoff, climb, cruise, descent and landing. Each of these parts do require a certain amount of practice and they are the same regardless of aircraft type. Practice really does make perfect.
Tip – You may have read previous articles on my blog about flying for virtual airlines and flying online with other pilots and controllers on the VATSIM or IVAO Networks. These are both fun aspects which can and will add additional layers of realism to your flight simulation experience. However, please wait until you have sufficient experience before pursuing as VA’s and the online networks require you to have the necessary skills to operate aircraft in all aspects of flight (taxi, takeoff, climb, cruise, descent and landing).
In addition to the Microsoft Flight Simulator flight tutorials which will help you tremendously, load up a flight in the default Cessna 172 Skyhawk from KEDW (Andrews Air Force Base, California). I suggest this location as the runways are wide and long. Consider turning off the options for other traffic and set the weather to imitate a clear, calm day and just spend time practicing and maneuvering your Cessna 172 both on the ground and in the air.
Depart the active runway and practice hand-flying the aircraft at first. Practice maintaining your speed, altitude and direction. Don’t worry about landing the aircraft at this time. Remember this is just a simulator and nothing bad will happen if you crash a few times. As you spend more time practicing your take-off maneuvers, you’ll get the hang of properly trimming out the aircraft where it will fly straight and level with minimum input from the controls.
Tip – While the aircrafts autopilot functionality can certainly assist in controlling the aircrafts direction, altitude, etc…these tasks should also be understood and practiced without the need of relying on the aircraft autopilot.
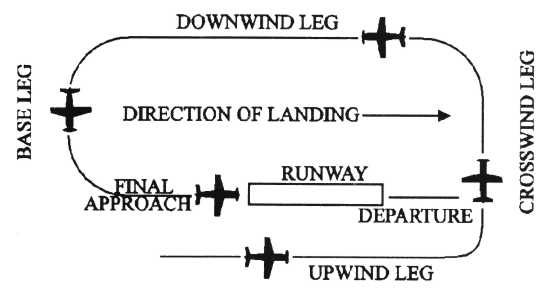
Once you can successfully taxi to the active runway, takeoff, climb and cruise you really only have two elements of flight to master and that is descent and landing. Again, using your default Cessna 172 at KEDW, practice landing maneuvers using the diagram below. Depart KEDW and fly a runway heading while climbing a few hundred feet. Practice turning on the crosswind leg, then again on the downwind leg (parallel to the active runway), then the base leg and then final approach. Don’t worry about descending and landing. Just practice this important maneuver and make sure you can correctly line up with the runway each time.
After you can demonstrate flying this pattern and being successful at lining up to the runway on final approach, then introduce descent and practice “touch-and-go” landing maneuvers. Again, KEDW is a perfect facility to practice this with runway 04R/22L being a long 15,024 feet in length (2.84 miles).
Tip – Remember “Pitch for Speed, Throttle for Altitude”. Trim your aircraft for the desired speed you want. Need to descend? Simply reduce power. Need to climb? Increase throttle/power and the aircraft will climb.
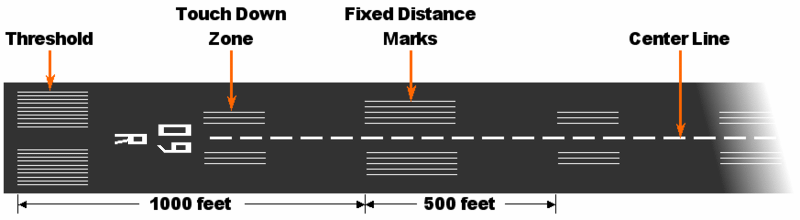
As you complete one after another successful “touch-and-go” landings, try to eventually land in the touchdown zone and centered on the runway. Practice will make this become perfect in time.
I can’t tell you how many hours it will take to master the maneuvers I’ve discussed here today. You should spend adequate time practicing until you feel comfortable. But I can tell you that in time it will eventually become second nature. As you get better and better controlling the Cessna then work your way up. Before you know it, you’ll be the PIC (Pilot In Command) of a Boeing 747 headed from KJFK to EGLL.
Until next time…
Happy Flying!!!
JT
Fine Print: Unfortunately I feel the need to state for the record that my “How To” articles and tips are for flight simulation purposes only and should not be used for real world aviation.
June 15, 2017 / admin / 0 Comments
A few days ago I reviewed all the various options you have in choosing a flight simulation application. I covered everything back to FSX and everything forward to Dovetail Games Flight Sim World, X-Plane and my favorite Prepar3D.
While some simulation game titles such as Truck Sim, Farm Sim etc. can be played with just a mouse and keyboard or even a slight upgrade to an X-Box style controller, the same really can’t be said for flight simulation. Yes, you can certainly fly only with the keyboard and mouse, but I’m confident that you’ll find learning to fly much, much easier with a good joystick setup. For me, flight simulation is more than just flying from point A to point B. It’s the extra level of immersion which a good set of controls provide and the ability to improve my virtual flying skills with each and every flight.
If you are going to spend your hard earned money on a new flight sim application, then consider spending a little bit more and purchasing a good joystick. From my early days with the Commodore 64 all the way up until approx. the late 90’s or early 2000 timeframe, that is all I used was a joystick. A very good joystick at a reasonable price is the Logitech Extreme 3D Pro Joystick. Amazon currently lists this joystick at $34.99. The 3D Pro might be considered entry level today, but that hasn’t always been the case. When I purchased my first 3D Pro (just a few years ago) it was over $100 and it also works well with Farm Sim. The joystick will do everything you need it to do from controlling throttle, rudder, ailerons and offers buttons which can be easily programmed to control flaps, landing gear etc.

Of course, just like with everything else…there are many different options you have in the joystick department. If you are looking for something a little more advanced then look into the CH Products Flight Sim Yoke and add the CH Products Pro Pedals for ultimate rudder control and precision landings. The Yoke sells on Amazon for around $130 and the pedals for about $120. The yoke offers a built in throttle, prop and mixture controls along with toggle buttons for flaps and gear. Additional thumb control buttons can be programmed to suit your needs. I’ve had my CH Products Yoke for well over 15 years and last year I replaced my pedals which had stopped working after about 12 years.

The CH Products Pedals can certainly be added at a later time.

You still have many other cool hardware accessory items you can add to increase your level of realism and fun. I’ll cover more of these in a later article. The purpose of this posting is to provide you with a few examples to get you thinking. I own and use these items in my setup and can tell you that if you take care of them, they’ll provide years of flight sim fun.
Until next time…
Happy Flying!!!
Jerry


